Thursday, June 9, 2011

magic toadstool


When I can’t afford to get my roots dyed, I like to swap half the cost for a Magic Toadstool cake for my hairdresser’s daughter. 

Ingredients:

2x340g packets buttercake mix
35cmx50 prepared board
1 ½ quantities butter cream (One quantity= beat 125 softened butter in a small bowl with electric mixer until it is as white as possible. Gradually beat in 1 ½ cups (240g) sifted icing sugar and 2 tbsp milk, in 2 batches. Flavour and colour as required.
Yellow and pink food colouring
15cm round cardboard

Decorarions:
4 pink fruit sticks
2 spearmint leaves
8 mini heart lollies
1 yellow fruit stick
25 large heart lollies
24 silver cachous
3 large white marshmallows
3 white marshmallows
1 tsp cocoa powder
Assorted mini fairy statues

Method: 

1. Preheat oven to 180C. Grease 1.25L (5 cup) and 2.25L (9 cup) pudding steamers.
2. Make cakes according to directions. Pour mixture into steamers until three-quarters full. Bake smaller pudding about 35 mins and larger pudding about 55 mins. Stand cakes in steamers 5 mins; turn onto wire rack to cool. Using serrated knife, level cake tops.

And here is where I ran into problem number one. After turning my nose up at the suggestion that I use packet cake mix, I decided to find a cake recipe that would suit the pudding steamers—simple, but not a cake that would rise too much because of the risk it would collapse in such a narrow space. I decided on AWW’s golden syrup coconut cake. 


So far, so good.

After the recommended cooking time of 40 mins, the cake was nowhere near cooked in the centre. I foiled it and waited. More than an hour passed before it was done.

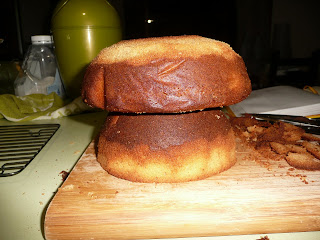
A bit brown on the outside, but as good as can be expected. Now to ease him out of his pudding steamer. 

Oh.
Let’s try again.

No time for nonsense any more. I went for AWW’s basic butter cake and hoped it wouldn’t collapse. I also lined the absolute crap out of the large pudding steamer. 


They took a little longer than described in the recipe which resulted in them browning a bit too much on the outside. No biggie, I need to trim them to make the perfect shape anyway. 


Now for the fun part!

3. Place small cake on board. Tint half of the butter cream with yellow colouring; spread all over cake for toadstool stem.


Firstly, can anyone tell me how those AWW ladies get their icing so smooth? We tried all sorts of utensils but it still looked a little on the ‘rustic’ side.


4. Position large cake on cardboard round, cut-side down. Position large cake on toadstool stem for toadstool cap. Tint remaining buttercream with pink colouring (we used purple), spread all over cap.


 5. Place pink fruit sticks, side by side. On flat surface; trim tops of sticks to make rounded door. Position on toadstool stem for door.

Musk sticks can be placed in the microwave for easy shaping. They can also be placed in the microwave for a couple of seconds too long and turn into a lumpy, exploding pink pile.


6. Split spearmint leaves in half centre; slice halves into three pieces. Use centre pieces for stems and side pieces as leaves; position around toadstool stem. Position two mini heart lollies at top of each spearmint stem for flowers (I couldn’t find mini hearts so Chon had the ingenious idea of using tiny slices of musk stick).

7. Cut yellow fruit stick into thin strips; using a little water, position on two large heart lollies; position on toadstool stem for windows (instead of this, I drew the windows with awesome edible glitter pens that I got from Coles. I also went a little crazy on the marshmallow toadstools). 

8. Position 6 large heart lollies on board at front of toadstool for path. Decorate toadstool cap with cachous and remaining large heart lollies.

9. Using a little butter cream, attach large marshmallows on top of smaller marshmallows, sprinkle with sifted cocoa powder; position around toadstool. Decorate toadstool with fairy statues (this happened later).

Phew! After a day of angsting, we managed to pull off a fairly decent looking fairyland wonder Birthday surprise. I didn’t get to eat the magical cake myself but I hear it went down pretty well. 

Wednesday, June 8, 2011

chocolate marsala cake


When you bake choc-fudge cookies that make you want to **** in your *****, how do you follow them up with a chocolate cake that doesn’t disappoint? Thank you, Nigella.

Ingredients:

Cake:
Scant ½ cup unsalted butter
4 oz bittersweet chocolate, broken up
4 large eggs
½ cup plus 1 tbsp sugar
1/3 cup self raising flour, sifted 3 times
3 tbsp Marsala
Icing:
4 oz bittersweet chocolate
1 tbsp Marsala
1/3 cup plus 2 tbsp heavy cream

Another Nigella quibble: crazy measurements. There has to be a simpler way to express all that.

Method:

1. Preheat the oven to 180C. Melt the butter and chocolate together in the microwave or a double boiler, and then set aside to cool slightly. 


2. Beat the eggs and sugar together until thick, pale and mousse-like and greatly increased in volume; they should double, triple even.


Gently fold the sifted flour into the egg mixture, trying not to lose all of the air. Now fold the butter and chocolate very carefully into the cake mixture (I should say at this point that of all the uncooked cake mixtures in this book this is without a doubt my favourite: leave yourself a decent amount in the bowl for scraping-out purposes. (Oh Nigella, how deliciously wicked you are. Lick that spoon)).
 

Pour into the pan and cook for 35 mins, by which time the top should be firm and the cake underneath dense and desirably damp.


Everything so far is going exactly as Nigella has described for me. The cake is a really nice matte colour, as if it’s been dusted with cocoa.


3. Cool on a rack for 5 mins, and then pour over Marsala. I find it easier to do this by the teaspoonful so that the liquid in evenly distributed. Leave the cake to cool completely before releasing it from its pan.
4. So, the icing: melt  the chocolate, Marsala, and cream in a heavy-bottomed saucepan over gentle heat.


Take it off the heat, and whisk until it reaches a good icing consistency; smooth, thick, but not solid. I like to spread this just on the very top of the cake, which anyway sinks on cooling so that you should have a roughly circular sunken pond to fill, leaving an outline of cooked-cake rim. When set, you’re left, beautifully, with a Sacher-shiny disc of ganache on top of this dusty-brown, matte cake.

Shiny brown pools, just like Osama Bin Laden's eyes.

Verdict: I didn’t have time to wait for the cake to cool because this birthday wasn’t going to wait. This actually turned out quite well. When I cut into the cake, the icing ran down the sides like a brown Nigella sauce.  All in all, it was a whole new cake-eating experience. It’s basically a chocolate mousse with a crisp layer on the outside which creates the illusion of cake-ness. I don’t even usually dig chocolate cake but this was a different situation entirely.


damp lemon and almond cake


I rang Mum and asked what she would like me to make for Mother’s Day dessert. She told me she would like something that doesn’t make her feel fat. I went through all my recipe books trying to find a cake that doesn’t make you fat, then I remembered that all cakes make you fat. So then I tried to find a cake that doesn’t create feelings of fatness. I settled on a Nigella Lawson recipe. Oh, okay...

I have mixed feelings about my new book, ‘How To Be A Domestic Goddess.’ It’s my first Nigella experience, and although the recipes look delicious, it gets very tiring wading through the constant erotica in attempt to extract the instructions on how to cook things.

Ingredients:

1 cup soft unsalted butter

¾ cup sugar

4 large eggs

1/3 cup all purpose flour

1  1/3 cups ground almonds

1/2 tsp almond extract

Grated zest and juice and zest of 2 lemons

Method:
1. Preheat oven to 180C. Cream together the butter and sugar until almost white. Beat in the eggs, one at a time, adding a quarter of the flour after each addition. When all the eggs and flour have been incorporated, gently stir in the ground almonds, then the almond extract, lemon zest, and juice. 

I can do that.

 
2. Pour the mixture into an 8 inch springform pan, greased and lined with wax paper. Bake for about 1 hour. I say ‘about’ only because ovens seem to vary so violently. I’ve cooked this in one oven when it was finished after 50 minutes; in another it needed 1 hour and 10 minutes. Whichever, after about 30 minutes you may well find you have to cover it loosely with foil; you don’t want the top of the cake to burn.

Hold on, Nigella. I have a feeling that regardless of the ‘violent’ differences that exist oven to oven, the cooking time may be more consistent if you’d given a more accurate description of how much lemon juice to use. Because I find that something that also varies violently is the size of lemons. In my violent oven, the cake took about an hour after being covered after 40 mins.

The cake is ready when the top is firm and a skewer, when inserted, comes out cleanish; you want dampess, but no battery goo. Take the cake out and let it stand for 5 mins or so in the pan. Then turn it out onto a wire rack and leave to cool.

3. Then, preferably, wrap well in tin foil and leave it for a couple of days. Push some confectioners sugar over the cake through a fine sieve or tea strainer when serving. I can’t stop myself murmuring ‘raspberries’ to you, either.
(It took a lot for me to copy down that last part).  
Serves 6-8

Verdict: I elected to serve the cake that day rather than tell Mum she had to wait 2 days before she could eat her cake. It was very damp, in fact I’m not sure it would ever be necessary to wrap it up. In Nigella’s long intro to this cake, she uses words like ‘slab,’ ‘dense,’ ‘sharp-toned meltiness’ and ‘gloriously plain.’ Although I wouldn’t have chosen those words myself, they all stand. The cake is delicious.